
Overview
Stretch Boy captures incoming audio and turns it into something you can slow down, speed up, smear, loop, and animate. A vocal becomes a floating pad. A drum hit grows a tail. A simple chord can become a moving texture.
This guide gets you playing first, then follows the interface from the preset bar to the final Output control. Record a moment, choose the part you like, then shape how it moves and sounds.
01InstallationInstall Stretch Boy and make it available in your DAW.
- Download the Stretch Boy installer from your account downloads section.
- Quit your DAW before installing.
- Run the installer and choose the plugin formats offered for your system and host.
- Reopen your DAW and rescan plugins if Stretch Boy does not appear automatically.
- Insert Stretch Boy on an audio, instrument, bus, or effects track.
Stretch Boy works with audio from a track, instrument, bus, or effects send. For your first capture, a single audio track is the easiest place to start.
02ActivationAuthorize the plugin with your Stretch Boy license.
A valid Stretch Boy license key is required for activation.
- Open Stretch Boy in your DAW.
- Review the license agreement shown by the plugin.
- Tick the acceptance checkbox and click
Accept. - Enter your Stretch Boy license key from Biggie Boy Audio.
- Complete activation while connected to the internet.
If activation fails, confirm that the license key was entered exactly as supplied, that your internet connection works, and that your computer date and time are correct.
03Quick StartGet from live audio to a moving stretched texture.
- Insert Stretch Boy on a track that produces audio. If you are using a software instrument, place Stretch Boy after it.
- Choose
Quiet Flow MemoryfromFactory Presetsin the preset menu. - Play your source in the DAW, then click the round
Recordbutton below the waveform. Click once to start recording; it stays on after you release the mouse. - After a few seconds, click
Playin Stretch Boy. This ends recording and plays the captured region from its beginning. - Set
Mixto100%and raiseTransformto around80%so you can hear the captured sound clearly. DragTimeleft to a negative value for slower playback. - Raise
Smearfor softness. Turn onMotion Power, choose aMotion Mode, and raiseMotionfor movement. - Adjust
Outputto a comfortable level, then use the preset menu toSave As User Preset...when something worth keeping happens.
Factory presets supply settings; you supply the audio. Stretch Boy also has its own playback controls, so use its Play/Pause and Stop buttons to manage the capture.
Start with a short phrase, chord, or drum loop. You can capture up to 60 seconds, but your first experiment does not need a plot, three acts, and a director’s commentary.
04Interface TourFind the preset bar, controls, waveform, transport, and bottom sliders.
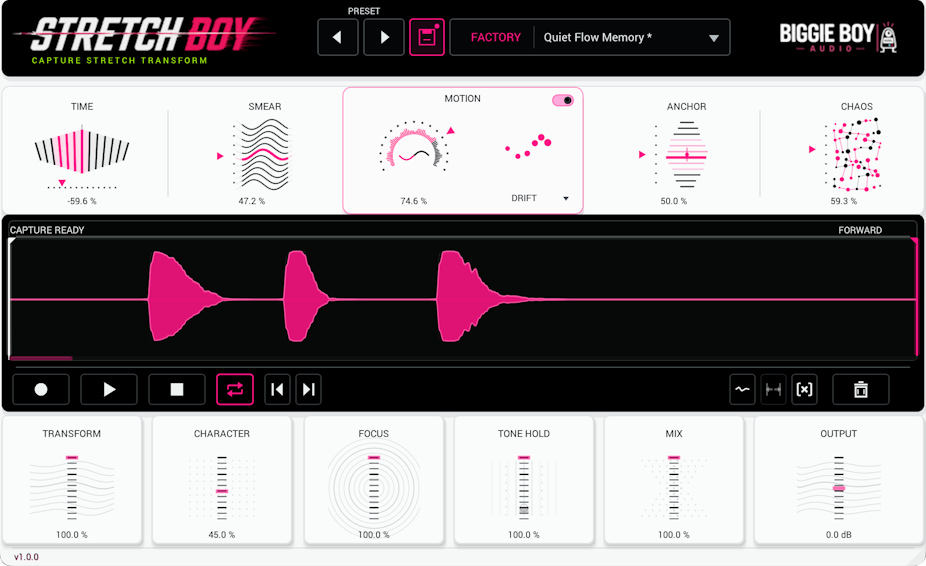
Earlier layout shown. The current transport adds a Loop button between Stop and Jump to Start.
1 Preset Bar
Browse factory sounds, manage user presets, and save settings with optional capture audio.
2 Top Controls
Set Time, Smear, Motion, Anchor, and Chaos. Choose the Motion Mode beside the Motion control.
3 Waveform
View the recording, audition moments, scrub position, and set the playable region.
4 Transport
Record, play, pause, stop, toggle Loop, jump to boundaries, switch waveform view, and clear audio.
5 Bottom Sliders
Shape Transform, Character, Focus, Tone Hold, Mix, and Output.
Drag Time horizontally. Drag the other main controls and the bottom sliders vertically. Click the Motion illustration or its mode name to open the mode list, then scroll to explore the groups.
05PresetsBrowse factory sounds and save your own settings and captures.
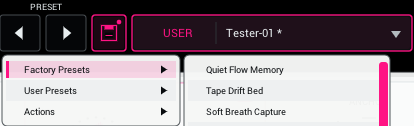
The arrows at the top step through the current factory or user preset collection. Click the preset name or dropdown arrow to open Factory Presets, User Presets, and Actions. The source label identifies Factory, User, or Custom, and an asterisk beside the name means the current state has changed.
Choosing a factory preset keeps the current captured audio, region, and playback position. It changes the sound settings, including playback direction and the Loop setting, so you can compare treatments using the same recording. Factory presets contain no demonstration audio.
Saving Your Own
The save icon updates an active user preset or opens a save-as prompt for a new one. The Actions menu also provides:
Save As User Preset...creates a new preset.Update User Presetreplaces the saved version of the active user preset.Import Preset...brings in a Stretch Boy.tspresetfile.Export Current Preset...saves the current settings and available capture to a.tspresetfile wherever you choose.Reveal Preset Folderopens your user preset folder.Delete User Presetremoves one saved user preset.Delete All User Presets...removes the user collection after confirmation.
User presets can include captured audio as well as settings. Look for [Capture] beside a preset in the menu. Loading one of these replaces the current capture with its saved recording, so save the current idea first if you want to keep it.
06Capture WorkflowRecord, replay, scrub, edit, and clear captured audio.
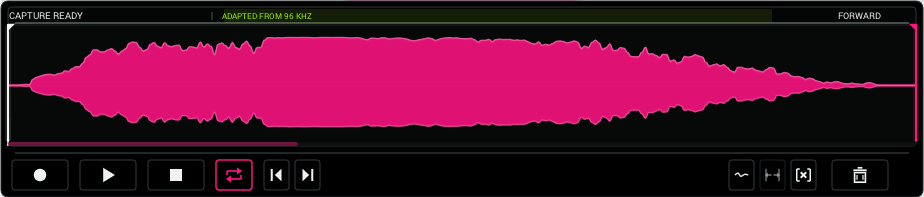
Earlier transport layout shown. The current player adds Loop between Stop and Jump to Start.
Record A Moment
Click the round Record button to start recording incoming audio. Click it again to finish and leave playback stopped. While recording, the incoming source passes through so you can hear what you are catching.
You can also click Play during recording to finish the capture and immediately play the region from its start. Click Stop during recording to finish and park at the region start without playing.
Recording into an existing capture begins at the current playback position and replaces audio as it goes. The region markers choose playback boundaries; recording can continue beyond them. For a completely fresh take, clear the buffer first.
The capture holds up to 60 seconds. Once full, continued recording overwrites older material. Save any capture you want to keep before recording over it.
Read The Waveform
The waveform shows the captured sound and the current playback or recording position. Its status tells you what is happening:
CAPTURE EMPTY: record some audio to begin.CAPTURING / OVERWRITING: audio is being recorded or replaced.CAPTURE READY: audio is available and playback is stopped.CAPTURE PLAYING: the captured region is playing.
The white start marker and pink end marker define the playable region. Drag them to focus on a word, hit, note, or useful fragment. Audio outside the region stays in memory, ready to use again when you widen the range.
Click or drag inside the playable waveform to move through the capture and audition what is under the pointer. This is scrubbing. Release to finish auditioning. If playback was running, it continues from the new position; if stopped, use Play to continue.
The Stereo Split button switches between a combined waveform and separate left/right views. It changes the display only.
Transport Buttons
- Record: Click to record; click again to finish.
- Play/Pause: Start playback or pause in place.
- Stop: Stop in place. During recording, finish and return to the start marker.
- Loop: Repeat playback. Pink means on; off stops at the next marker.
- Jump to Start / End: Stop and move to that marker.
These buttons control the capture, independently of your DAW transport.
Playback Options
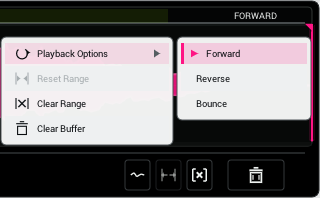
Click the playback label at the top right of the waveform, or right-click the waveform, then open Playback Options.
Choose Forward to play toward the end marker, Reverse to play toward the start, or Bounce to alternate directions when looping.
Turn Loop on to repeat. Turn it off to stop at the next marker. Press Stop to stop immediately at the current position.
Resetting And Clearing
Reset Range opens the region back out to the full capture. It keeps the audio.
Clear Range erases the audio inside the selected region, leaving that space quiet and the overall capture length intact. Audio outside the region stays available.
Clear Buffer empties the entire capture and resets its playback region. This is the trash-can button at the right of the transport strip.
For the Clear Range and trash-can buttons, press and hold for about a second until the button fills. Releasing early cancels the action. The same commands in the waveform menu act immediately when selected.
07Main ControlsShape time, smear, motion, stability, and instability.

Time
Changes how quickly Stretch Boy travels through the capture. Left or negative values move slower and more stretched; right or positive values move faster.
Smear
Blends nearby moments of the capture into softer trails, washes, and clouds.
Motion
Sets how strongly the selected Motion Mode animates the sound. Raise it gradually after choosing a mode.
Motion Power
Turns the Motion section off and on. Off keeps the selected mode and amount ready, but removes motion depth from the sound.
Anchor
Controls how firmly the transformation stays connected to the captured source. In Fold mode, it also places the fold center.
Chaos
Adds irregularity, instability, and edge. Lower it first when a promising sound gets too unruly.
Use Tone Hold when you want stretched notes to keep more of their original pitch identity. Choose Reverse in the waveform playback options when you want backward playback; negative Time values mean slower playback.
08Bottom SlidersRefine transformation, identity, blend, and final level.

Transform
Blends the capture from source-like playback toward the full stretched, smeared, and animated treatment.
Character
Changes the tonal color, density, and edge of the transformed sound.
Focus
Controls how clearly the transformation follows the identity and detail of the source.
Tone Hold
Helps preserve the pitch and tonal identity of the capture as it stretches and moves. It is not pitch correction.
Mix
Blends incoming track audio with capture playback. At 100%, you hear the capture while it is playing.
Output
Set the final volume. The middle keeps the level unchanged; move up to boost it or down to soften it. All the way down fades the sound to silence.
With Mix at 100%, lowering Transform lets you hear a less transformed version of the recording already in memory. Lowering Mix brings back what is entering the plugin right now.
09Motion ModesChoose the personality of the captured movement.
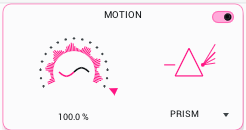
Motion Mode changes the personality of Stretch Boy’s movement through the captured memory. The same capture can feel steady, floating, rhythmic, fractured, or tone-shaped depending on the selected mode and how far you push Motion.
Think of the menu as a set of motion families rather than a fixed catalog. New modes may appear over time, but the listening approach stays the same: choose a family that matches the role of the sound, raise Motion until the movement speaks, then tune Smear, Anchor, Chaos, Transform, and Mix around it.
If the capture should support the track, start with gentler movement or cloud-like modes. If it should become the hook, try rhythmic, digital, harmonic, or more unstable movement and pull Mix back until it sits.
Movement And Direction
Smooth scans, drifting motion, swinging movement, folds, pulls, and other directional behaviors. Good for keeping a captured phrase or chord alive without immediately turning it into an obvious effect.
Cloud And Space
Diffuse layers, suspended washes, particles, trails, and broad stretch textures. These are useful for pads, transitions, atmospheres, vocal beds, and sounds that need to bloom around the source.
Rhythm And Digital
Repeating pulses, stepped movement, fractured gestures, crunchy color, and animated digital behavior. These modes tend to reveal themselves quickly on drum loops, short hits, and rhythmic captures.
Harmonic And Tone
Pitch-colored movement, overtone emphasis, resonant motion, and vowel-like shaping. Use these when the capture should become more melodic, synthetic, or voice-like as it stretches.
10Saving CapturesKeep capture-bearing sounds safe between sessions and computers.
Save a user preset when you want to keep both a sound treatment and its recorded source. Check for [Capture] in the user preset menu, and export a .tspreset copy for a portable backup. These files contain the source capture and settings; use your DAW to record or render the finished effect as an audio file.
DAW sessions save settings and references to captured audio stored separately on your computer. Copying the DAW project alone may leave the capture behind. For a move to another computer, export a capture-bearing preset for each Stretch Boy sound you need, copy those files with the project, and import them on the destination system.
For full backups, preserve Stretch Boy’s Presets/User and SessionCaptures folders. Reveal Preset Folder opens the first location; SessionCaptures is inside the same product folder, two levels above User.
If the plugin reports Capture unavailable, the recording it expected could not be restored. Load a saved preset containing that capture, restore the missing capture files from backup, or record the source again.